Color

Burgundy Is Back – Home Decor Trends

Pick up any fashion magazine or look on just about any social media site and you will see Burgundy everywhere.  It’s back and in a big way – in home decor and fashion.  Now, trust me, we have had a lot of conversations about this over the last several weeks.  First, nobody likes the word Burgundy.  It seems like it takes us back to the 90s when Burgundy and Hunter Green ruled the roost.

Well never fear, whether you want to call it Burgundy or Merlot or Oxblood or Garnet – it’s still Burgundy.  But it’s an updated Burgundy that is less Brown based and more purple based.   Now I’m not suggesting that you go backwards to Burgundy and Hunter Green.  But touches of the old/new color can sure add some spice to your life and show that you are right on trend.

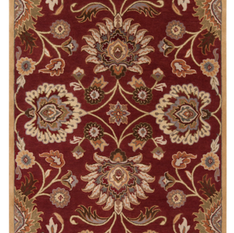
Here are a few ways to incorporate Burgundy into your home decor and your personal style as an accent or hey go crazy with it.

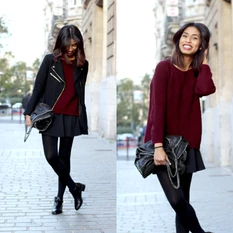
Freshen up your basic black outfit with a pop of Burgundy Color!  So Chic!

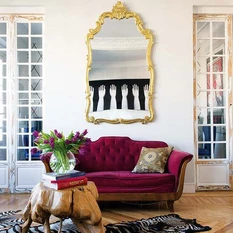
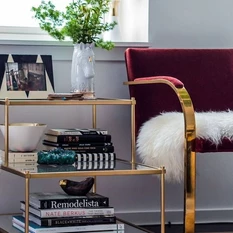
Mix the return of Burgundy with the return of Gold to make a major statement.

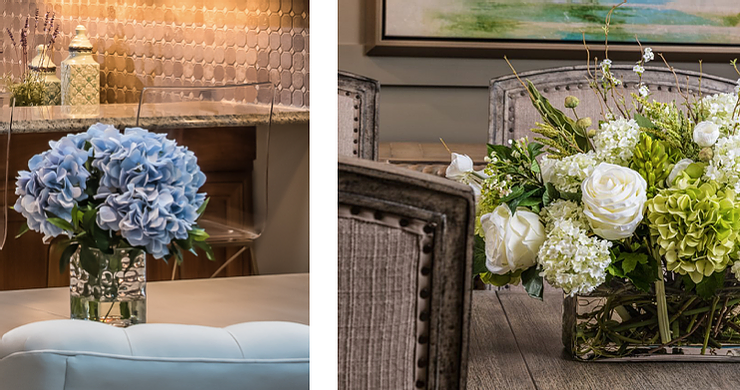
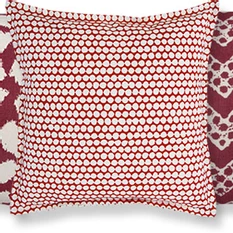
With all of the white and grey we are using in our clean, neutral decor today – accent pillows of Burgundy will add just a bit of sophistication and glam to any room.  And what could be easier than pillows to update your space.

Whether it’s a little or a lot come back to the future with Awesome Burgundy.  I know I am.

Before and After

My Reclaimed Wood Ceiling

To say I’m a little obsessed with all things reclaimed wood, would be an understatement.  First it was my new mantel and now it’s my tray ceiling in our master bedroom.

It all started when I saw this amazing reclaimed barn wood.  I knew I had to use it in my own home somewhere.

“The lightbulb went on when I was deciding on a paint color for my master bedroom tray ceiling — the perfect place for the wood planks.  It will add the texture and warmth that the room needs.”

Here are the pictures from start to finish!

untitled image

How many guys does it take to install these wood planks?  Two and one person cheering them on.  Seriously working with anything that’s over your head is not an easy job and my guys did an amazing job.

Now that the ceiling is done, it’s on to the wallcovering.  I have had my eye on this wallpaper even before we bought this house.  I knew I would be using it somewhere.   I’m just applying it on the main focal point wall.  What a statement it makes!

It’s always the accessories and lighting that finishes every room.  The reclaimed wood and the crane wallcovering all make pretty bold statements, so the chandelier couldn’t be wimpy.  And it’s not.

This FABULOUS Spiked Chandelier is truly the icing on the cake.  It is totally unexpected in this space — which is why I like it so much.  Now it’s time for bedding and accessorizing the entire space.  Pictures of the entire master bedroom coming soon. 🙂

Before and After

Porch Ceiling Paint

As many of you know, we have been in MAJOR repainting mode in our house for the last 2 months — and we are finally making it to the outside.  It’s been a crazy time — so much so that my youngest, Campbell, asked me why the painters weren’t in our house this morning.  They have become part of the family it seems.

The photo below is of our covered back porch before we purchased the house.  The sage green ceiling and heavy chairs are so not me.  So it’s time for bright, light and happy to happen.

I knew that I wanted to paint the ceiling a soft blue.  I’ve always been told that painting your porch ceiling blue fools the bugs into thinking that it’s the sky and they won’t nest there.

Well, in the South, there’s also an old legend that people painted their porch ceilings haint blue to keep away the haints also known as the evil spirits.

Honestly, I don’t care if it keeps the bugs or the evil spirits away as long as it’s pretty and happy and makes me smile when my family is out there.

I landed on the Valspar color Sky Blue! Then I added three awesome new fans and it’s opened and brightened up the entire porch!  The girls actually like being out there now and so do I.

I added the dining table chairs and area rug this weekend.  Next will be to add some artwork to the brick wall to tone down the red.  Stay tuned — a full reveal will be coming soon.  You know where I will be this evening.

Press

Introducing Design 101: A New Seminar Series

Okay, y’all, I will be honest with you…I am beyond excited to share this news with you today because it has been a LONG time in the making. 🙂

I’m proud to announce Design 101, an interior design seminar series, created and led by Lauren Nicole Designs and sponsored by our favorite Charlotte magazine: QC Exclusive !

Sponsored by:

Mom and I love to connect with y’all and share our love for interior design, so we figured out a way to teach our tips and tricks to you too! We will share our inside scoop and knowledge on hot-topic design issues such as how to accessorize your mantels and bookcases, holiday decorating, all you need to know about flooring, space planning, paint tips…and the list goes on!

Our Design 101 seminars will be fun and interactive and at the end of each seminar, you will feel better prepared to tackle all of your decorating decisions! Gather your girlfriends and come to one or come to all of them. It’s going to be super fun!

The debut seminar  is called:

BOOKCASES, MANTELS, ACCESSORIES: OH MY!

In this particular seminar, we will be tackling one of our favorite parts of designing a home: ACCESSORIES. Accessories add style and personality to any space, so selection and placement is very important. By the end of this seminar, you should be ready to go home and accessorize your mantles and bookcases with ease. 🙂

Date: September 10 from 9:30am to 11:30am

Location: Providence Country Club in the Muirfield/Prestwick Room

Cost: $95.00

Please register for this seminar HERE.

To check out the rest of the Design 101 seminars we are offering the rest of the year:

click here!

Make sure you register early, because spots will fill up fast!

If you’ve ever wondered…’how can I get that custom look in my house’ then sign up now! This is your chance to get the inside scoop!

Before and After

My Updated Fireplace & Reclaimed Wood Mantel

When we bought our new to us home, I knew I had a big job ahead of me.  The house hadn’t been painted in at least 15 years and was very dark and needed a major update.   Below is a before photo of the family room.  It worked for the family that lived there, but I needed bright and light and happy.

Stay tuned for a full blog on the makeover of the family room, but for now I want to focus on the mantel & fireplace makeover.

When we first looked at this house, I immediately knew that I wanted to paint the fireplace and add some interest, history and beauty with a reclaimed beam mantel.  So my first stop was meeting with my favorite reclaimed wood guys.  They are Awesome!

untitled image

The whole family is always involved around our house, so it was no surprise to Chris (my hubby) when I asked him to hold up the beam just so I could make sure where I wanted it mounted.  How long do you think I made him hold it there?

A quick trip to my studio to pick out some artwork and we’re done.  Of course, I’ll be adding a fireplace screen and other accessories — always need more accessories.  But I am crazy about how it turned out.

Color

Paint Palette for Our New Home

After much thought and looking at every gray there is (and there are a lot of them), the final paint palette for our new home has been selected.  Drum roll please.

I chose Benjamin Moore’s Wickham Gray for all of the main areas — foyer, living room, dining room, family room,  playroom and all hallways.  Paired with crisp white trim and white ceilings, it’s the perfect neutral.

The goal for our master bedroom is restful and serene — a place to escape from all of the craziness in my life.  Benjamin Moore’s Summer Shower paired with this amazing wallcovering is just the ticket.

Chris’s office is right off of the foyer, so it has to make a bit of a statement (sorry no before pic but stay tuned for plenty of during and after).  Since he tends to like a more masculine feel in his office and he loves dark gray –  Boothbay Gray it is.  The perfect backdrop for him to get lots of work done.

And finally the guest room – I want this to be a happy place for anyone that comes to stay with us.  I’m re-using draperies that were in one of my girls’ rooms in our old house (score 1 for me).  They’ll be perfect with Benjamin Moore’s Blue Bonnet.

My girls have lots of personality and definitely have had a say in how their rooms will look — love their creative nature!  Finley is my purple girl and really likes a more clean soothing look (wonder who she takes after?).  She and I chose Lavender Mist for her walls and for her ceiling I chose Whisper Violet and cut it down by 50% with white.  I painted her closet the same color as her ceiling which ties everything together.

For Campbell who specifically asked for a “beach room” things needed to be amped up a bit and since she wanted lots of flamingos I headed toward Miami inspired colors.  Ice Blue was selected for the walls and again I took Nursery Pink and cut it down by 50% with white for the ceiling and her closet.

***The kitchen is TBD since all of my cabinets are getting painted and I haven’t quite nailed that down yet.

Stay tuned here and on Instagram to see how everything is coming together and for final pics as I pull each room together.

Always an adventure around the Clement house!

Color

How to Pick a Paint Color

We settle on the new (new to us) house next week and the very first thing that has to happen is FRESH PAINT.  And I mean everywhere — all rooms, main areas and even the kitchen cabinets.  So here’s the age old question (and one I hear literally every day) — How do I know what color paint to pick?

Just follow a few simple tips (I was going to says rules of thumb – but in design rules change for every situation):

1st – ask yourself what colors make you happy – go with what you love vs. what the trend is.  You may need to look for photos of inspiration rooms to help with this.  Or you may have a piece of art or furniture that’s your starting point.

2nd – consider using the same color throughout your main areas that connect all of your rooms.  This will make your home look larger and more unified.  If you want to paint rooms off of your main areas a different color – go at least 2 shades lighter or darker – this will give you a great visual transition.

3rd – paint a test square.  Make the square big enough so you can really get a good feel for the color – at least 2’x2′.  Look at the square morning, afternoon and night.  Trust me the color will slightly change throughout the day.  What was grey in the morning, could be lavender at night.

4th – trust yourself – the great thing is that paint is not permanent


A Few Other Tips

When it comes to trim – keep it white.  Benjamin Moore’s Simply White is a great choice.

I typically paint my walls in Eggshell and my trim in Satin or Semi-gloss.

Don’t forget the ceiling – as soon as you paint your walls your trim and ceilings will immediately look dingy.  If you want to keep your ceilings neutral consider going with a ceiling white.  Or in many cases, I will take the color of the paint I’m using on the walls and cut it down to 25% of the wall color.  It gives a wonderfully easy transition from wall to ceiling.

Stay tuned for next week when I show you how my painter and I make selections for every room in my house.  It should be excitiing!!

Design Tips

Paring Down

Downsizing Can be Painless

Not only am I reducing the size of my home by 1000 square feet, we’re also going from an open concept floor plan to a floor plan that has more defined and smaller rooms.  This means downsizing in all areas is a must.  So I don’t make myself a crazy person, I’m sticking to a few downsizing rules that will make this entire process easier.

**Determine Your Lifestyle in your new home — how does your family live and how is each space going to function for you.

In our family, we need a crafting, creative space for the girls, a space for playing the piano or just having some quiet time, a space where we can lounge on our sectional sofa, office space for both Chris and I and an awesome outside space as we love being outside as much as inside.  So now I:

**Start by Taking Stock – ask yourself:

“what are the things we absolutely can’t live without &

“what are the things that I haven’t used in the last year &

“what are the things that I need to fulfill our lifestyle needs”?

Then…

**Start Editing  (that’s fancy talk for Declutter)

In the Kitchen ask yourself:  “do I need 3 sets of dishes?”  “do I need 37 coffee mugs that don’t match?”

In the playroom:  Do one cut without your kids and either throw away or donate those toys you know the kids are grown out of.  Now do a 2nd cut with the kids and let them decide–of the toys that are left, which are ones that they really don’t want any more and can donate to other children.

In the storage room:  If you haven’t used any seasonal decorations in the last year — get rid of them.

In your closets:  If you haven’t worn it in the last year – donate it!

**Lastly, re-edit when you unpack

Your perspective changes a little when you are in your new home.  You’re not under as much stress — you know the stress when you are so sick of packing you just pack everything anyway?

As you’re unpacking take a fresh look at each thing and ask yourself – “does this fit into my new space and my new chapter in life”

Change is hard in the Beginning,

Messy in the Middle and

Gorgeous at the End.

How to

Packing Tips for Moving

As excited as I am about our new home, our new neighborhood and a whole new design plan — I am not so excited about the packing process.  But having moved 6 times in the last 7 years, I’ve come up with a few packing tips that make life easier, help you reorganize and get rid of clutter.  So here we go:

1 – Start Early – there are always things you can pack early — seldom used kitchen items, off season clothes or off season decorations

#2 – Don’t Mix Items from Different Rooms – start in one space and only pack items in each box that will all go back in that space.

#3 – Label all Boxes as You Pack Them – and be detailed about it.  Write the room and what’s in the box.  If you can, it’s also helpful on move in day if you color code the labeling on each box.  Pink for your daughter, Green for the Kitchen, etc.

#4 – Electronics – When it comes to all of your precious electronics, bubble wrap the cords with the piece it goes with – don’t just throw all of the cords in a box.  And if you have several cords that all plug into one piece, take a photo on your phone of where each plug goes.  You’ll thank me for that one.

#5 – Consider Plastic Bins – this is great, especially if you are moving locally.  Take your hanging clothes and put them in bins,hangers and all.  It is so easy to go from the bin to hanging your clothes right up.

#6 – Don’t Use Newspaper – newspaper is dirty and can bleed onto dishes or important documents.

#7 – My Personal Favorite Tip – You need 3 things with you at all times in each room:

1 garbage bag for trash

1 garbage bag for donations

1 box for packing

Ask your yourself if you’ve used an item in the last year.  If not throw it away or donate it.

Now’s your chance to pack yourself into organizational bliss!

Design Tips

Olivia the Cat is Moving

Olivia the Cat is Moving (and so are WE)!

The search is over!  We’ve found the perfect neighborhood home that’s closer to our girls’ friends and school.

And while we are all so excited for the new adventure,  our new home is about 1,000 square feet smaller than our present home.  It’s also an older home which means a floor plan that’s not quite as open as I’m used to.  This is presenting some exciting challenges for us as a family and for me as a designer.

Tag along with me (and of course Olivia) as I share our journey through moving, renovating and designing all of the special spaces in our lovely new home. Our closing date is mid June and the work immediately begins on that day!

Oh, and watch out for Olivia — You never know where you’re going to find her.

Design Tips

Spring Entertaining And Decor Tips

Spring is a time for renewal…trees and flowers are blooming, color is re-appearing everywhere, and Easter is just around the corner!

I wanted to share with you some tips on how to prepare your homes for spring entertaining. Spring is one of my favorite seasons and it’s all about bringing the outdoors in. Which leads to my first tip…

Bring On The Flowers: You can accessorize with fresh flowers or faux flowers. I personally prefer faux — one because I have a terrible memory when it comes to watering fresh plants, two because there is less clean up of the fallen petals and leaves and three because fresh flowers can get expensive in terms of upkeep. Just make sure when using faux that you spend a little more money to get the high quality versions. Don’t go the cheap, plastic route here, as it will just downgrade everything else you have on display.

Repurpose What You Have: Spring is a short season that seems to go by in an instant, so don’t invest in heaps of bunny accessories and Easter eggs. Instead, use key decor pieces that can evolve from one season into another. For example, the same hurricane vase centerpiece you had filled with ornaments at Christmas time can be filled with moss, cotton stems or other greenery for springtime. You also can take your boxwood wreath and use it as the base for a larger centerpiece.

Use White Dinnerware: This should be a staple in every home. White dinnerware will serve as the base of your place setting, then you can highlight and bring out the color and the season with colorful salad plates, bowls, glasses or cloth napkins. Another inexpensive way to add a personal touch to white place settings is with brightly designed name cards for each of your guests.

Have A Statement Piece On Your Table: This could be a “wow” centerpiece (like the hurricane vase) but it doesn’t have to be. You could instead opt to highlight your table with a patterned table runner, fun placemats or, as mentioned above, even let each place setting serve as its own statement.

Lastly, Keep it Simple: Just like a room design, you don’t want to have so much going on with your table that you don’t know what to look at first. After all, when you’re entertaining, your guests and the food are the real stars of the show. The decor and accessories are there to serve as a beautiful, welcoming back drop to each of your events, whether large or small.

Hopefully these entertaining tips will give you more confidence in hosting an Easter brunch or dinner for your own family and friends this spring. I can help you with the decor, but when it comes to cooking — you’re on your own 😉